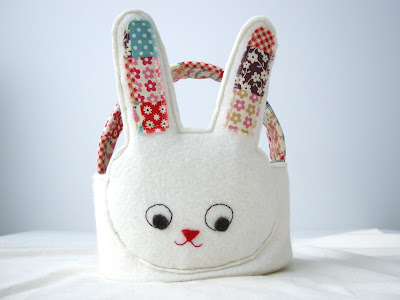
This cute little bunny basket would be great for holding Easter goodies or collecting eggs at an egg hunt, but once the holiday has passed, it would also look sweet in a child's room or nursery as it corrals toys, burp cloths, or other odds and ends.

YOU WILL NEED
- One fat quarter of patterned fabric
- One fat quarter of sturdy fusible interfacing (how sturdy depends on how sturdy you want the basket – and it doesn’t have to be fusible)
- ¾ yard of white felt
- Scraps of felt for bunny’s eyes and nose
- Embroidery floss to match the eyes and nose, plus make whiskers (optional – as you can see, these whiskers are invisible)
- Bunny head pattern (download here) – print without choosing the "fit to page" or other similar options and it will print the right size for this project.
CUT OUT
Basket body:

- 21 ¼” x 4 ¾” from fabric
- 20 ½” x 3 ½” from interfacing
- 21 ½” x 4 ¾” from white felt (note that this is ¼” longer than the fabric piece)

- 6 ¾” circle from fabric & interfacing
- 8” circle from white felt
- NOTE: I used plates as cutting guides – see note below for adjusting the size*

- 12” x 3” from fabric (optional)
- 12 x 1 ¾” from interfacing
- 12” x 4” from white felt

- 2 from white felt
- 1 from interfacing, then trim about ¼” all around
- 2 inner ears from fabric
- Eyes and nose from felt scraps
CREATE THE HANDLE

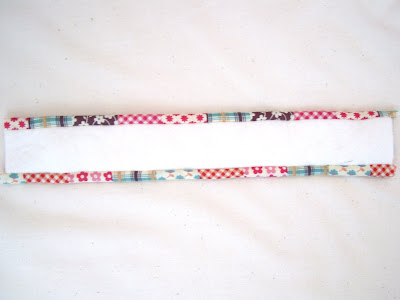
1 Set the fusible interfacing in the middle of the felt. Fold the ends around to meet in the middle; iron the felt to the interfacing. (Use dry heat; don’t steam.)
NOTE: You can stitch the felt in place and leave the handle as is, but if you want to make the underside match the lining and have those little borders on top, read on.

2 Lay the 12” x 3” piece of fabric face down on top of the felt handle, which is face up. Align the right edges.

3 Stitch down the handle, ¼” from the edge. When you fold it over and around, you’ll have a nifty little border with no seam showing.

4 This next part is a little trickier, but not too bad. Wrap the fabric around the bottom and back up to the top so you can tell where on the fabric to stitch next, or at what point the fabric will be ¼” from the left edge. Make a little snip in the end of the fabric to mark this line, or just make a little dent with your fingernail. (Sorry I didn't take a picture of that!)
5 Unwrap the fabric and line up that mark with the other edge of the handle. Once again, right sides will be facing. (In this picture, the handle has been flipped around so I’m working with right edges again.)


6 After getting it lined up, you can either go ahead and start stitching ¼” from the right edge, or you can snip off the excess fabric first, which will make it easier to keep things lined up as you sew – plus, you’ll be able to see what you’re doing much better.

7 Sew ¼” from the edge and turn. This is the point at which I was crossing my fingers and hoping pretty hard that it would work. I thought of this method at the last minute, and I didn’t know if all the interfacing bulk would make turning impossible or not.


8 Luckily, not! Use your thumb to push the felt through.

9 Voila. Press to get things nice and flat. Set aside.
CREATE THE FABRIC LINING

1 Fold the short ends of the long body piece together, right sides facing. Sew the ends together with ½” seam. Press the seam open.

2 Grab the bottom circle piece and match the edge up with your body piece, right sides facing. You can pin them together, or you can just match them up a little at a time as you sew.

3 Sew all around the circle with ¼” seam allowance. Overlap your stitching a little at the end for strength. Don’t turn.
CREATE THE FELT BASKET

1 Repeat steps 1-3 of the lining instructions using white felt, only in step 3, sew around the circle with ½” seam allowance and turn right side out. (In the picture I'm doing ¼” – and it wasn't enough, I had to go back and sew it ¼” more. LEARNING CURVE.) You can see how you kind of bunch up the felt as you go, or maybe "shape it" is a better term. Be the master of the felt.
NOTE: An alternate way to do the bottom, which I just found a tutorial for -- and had I found it sooner, probably would have utilized -- can be found here. Basically it involves trimming your thick interfacing just a little smaller, sewing it to thin interfacing, and sewing your thin interfacing to the fabric, or in this case, to the felt. OR -- and I feel like kind of an idiot for not thinking of this as I made the basket -- you could just stitch the circle of interfacing to the felt bottom before sewing the body of the basket to it. Duh.

2 Place the lining inside the basket to see if it fits well. If so, trim the seams around both the felt and fabric circles to about 1/8” to get rid of the bulk.
SEW IN THE INTERFACING

1 Set the circle of fusible interfacing inside the bottom of the basket, making sure it fits. (See note above -- you can do this before sewing on the sides, and it will be a little easier.)

2 Sew all around the edges to keep it in place. (Basket can be inside out or right side out as you sew, whichever works better for you.)

3 Turn the basket right side out if you haven’t already. Place the long piece of interfacing inside, making sure it fits. Trim the short ends if necessary (they should just meet each other, and not overlap). The top of the interfacing should be about ½” to ¾” below the top of the felt, enough so you have some room to turn the top of the felt down over the interfacing. I had to do a little trimming along the top where the two short edges met because one side was slightly higher than the other.


4 Align one of the ends with the seam in the felt. Stitch in place. Bring the other end around, wiggle it to fit just right, and stitch the other end in place on just the other side of the seam.

Looks like this on the outside.

5 Optional: Make a few snips in the top of the felt (keep them about ¼” away from the interfacing). Fold the ends of the felt over the interfacing and press in place. It's OK if it doesn't totally stick; you can fold the felt over as you sew in the lining.
6 Another option: Sew the bottom of the "body" interfacing to the basket.
ATTACH THE HANDLE, SEW UP THE BASKET

1 Place the lining inside the basket and use the edge of the felt as a guide to see how much you need to fold down the top of the fabric onto itself (wrong sides facing). Remove the lining and press the fold. This will give you a smooth edge when you stitch the lining to the basket.

NOTE: First I pinned the handles in place, and after bending a pin in half (4 layers of felt + 2 thick layers of interfacing!) I had a moment of compassion for my sewing machine and decided to sew on the handles by hand. After doing one, I decided to give my machine a chance on the other, and it did fine. So either by hand or machine, whatever works for you. You will probably want to change the needle after this project, though.

2 Put the lining back inside the basket and hold the two top folded edges together. Pin if you want. Sew around the edge of the basket, about ¼” from the top edge.

3 Catch the handle ends as you go (let them extend about ½” below the seam). Backstitch to keep them secure.

4 You are done with the basket! Now for the bunny.
MAKE THE BUNNY
Here is the pattern, in case you didn't see it at the beginning. Print without choosing the "fit to page" or other similar options and it will print the right size.

1 Sew the fabric inner ears to one of the felt rabbit heads. Straight stitch, no fancy stuff. You could cut the pieces bigger and appliqué them if you really don’t want raw edges, but I thought frayed would look cute.

2 Arrange two small brown circles and a little red triangle on the face. Play around with the placement – eyes close or far apart, high or low on the face. You could make one eye big and one eye small, use googly eyes, buttons, whatever.


3 Use embroidery floss to stitch the eyes and nose in place. Stitch circles around the eyes and a little red mouth with leftover floss. 18” of floss (2 strands) was enough for each of the eyes and the nose/mouth, but 24” would be a good length to be safe. STITCH WHISKERS, TOO! I forgot them. So I'm pretending they're invisible.

4 Layer the back of the bunny head, the interfacing, and the front of the bunny head.

5 Stitch around the edges with 1/8” to ¼” stitch; leave part of the head open.

6 Stuff the ears and face with a little cotton batting. (This was some leftover upholstery fluff from another project; I placed it behind the interfacing layer because it’s brown and showed through the felt.)

7 Finish stitching the head closed. Trim around the edges to even things up.

8 Hand stitch the bottom half of the bunny’s head to the basket. I used a running stitch, but reinforced it at both ends and a few spots in the middle.

9 My favorite feature: it makes a little pocket! Perfect for little treasures or a special note.


3 comments:
The perfect tutorial for spring - thanks for sharing! This one is cute enough to use year-round :)
Absolutely adorable! Thanks for sharing.
Great job on the tut!! CUTE basket!!
Post a Comment